
This
design is intended for vinyl cutting
(checker ring and contrast base ring) and
card stock or vinyl (holly and berries).
Cut design elements from vinyl then
follow conventional
process to add checker ring and optional contrast (white)
onto a wood circle such as those commercially available
from craft stores. Size
recommended is 3.5” diameter disc.
Use the plus sign symbol to align vinyl
contrast ring
and checker ring over the marked disc center point.

for a festive Christmas decoration.
For customized coasters
or ornaments, prepare and attach specific vinyl initial
letter
from the “Alphabet Letters A-M” or “Alphabet Letters N-Z”
separate
designs which are sized to fit easily
in the center of ring.

Checker ring
measures approx. 3.25” in diameter.
ASSEMBLY: 1. Obtain a 3.5" or equivalent base disc
for coaster(s) or ornament, such as these laser cut wood
discs (available from Hobby Lobby or other outlets).
If you have not previously completed a project using
cut design vinyl, search online (including Silhouette

2. Identify and cut the shapes from vinyl:
A contrast show-thru ring
B checker design ring
C optional lower case initial, from separate file
D base disc

3. Weed the "waste" outer, inner and
checker bits from the checker circle, from
the contrast ring, and from the initial letter.
4. Use transfer tape to transfer the vinyl from backing
and prepare to attach to the disc base.

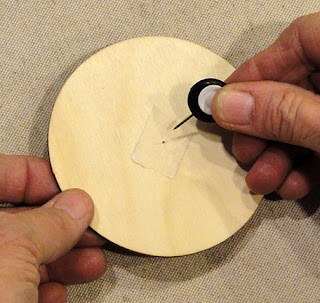
5. Create a center point registration on the base disc
to help with aligning the ring(s) precisely.
Place a piece of (temp) masking tape in the approx. center
of disc, then lay the disc on a gridded mat or equivalent
and straight edge to mark small tick at center. Then
repeat for the other perpendicular axis. Where the two
tick marks cross in the center.
Push the tip of a push tin into the tape to create
a pilot for positioning to follow.
NOTE: the small nick that may result in the surface
of the disc underneath the tape may be covered by
the lower case initial letter. To prevent an unwanted or
uncovered mark, stack 4-5 layers of masking tape
so that the pin can push into tape thickness without
marring disc surface.
6. Insert the push pin through the center of the '+' mark
center from backside to front, then position
the contrast ring over the disc and push the pin point
lightly onto the prick point. Hold in place while
the vinyl is slid down the pin shaft and onto the disc
surface. Double check for centered-ness at ring
outer edges, then press the vinyl into place.

7. Peel away the carrier sheet, leaving ring and
center registration '+' in place.

8. Repeat the process by inserting the push pin point
through the checker ring vinyl transfer tape at
center of '+' registration, then placing pin point
onto the center prick as before. Carefully slide down
into position, checking that the ring edges will align
with and cover the contrast ring, then press in place.
Remove transfer tape, then carefully remove center '+'
vinyl and tape.

9. Assemble the holly sprig and berries circles
from vinyl or card stock, then . . .

. . . position and attach or glue in place on disc.

10. If desired, position and attach the initial letter
of choice, centered within the ring.

Convert the coaster disc into an ornament by drilling
a hang hole at center top (optional vinyl contr. ring
includes hole location), add large jump ring and
decorative hook. Consider placing the checker ring
and holly on back as well as front.

No comments:
Post a Comment