
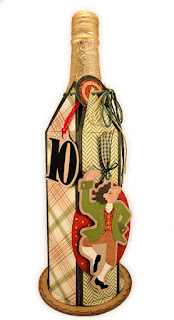
bottom curved tabs to scalloped and plain circle base,
thickened
for sturdiness, to as gift “wrap” for 25
oz
sparkling grape juice or cider bottle
(with approx. 3.1875” diameter).
Offset accent overlays decorate each wall,
with punch holes through layers to
thread a ribbon or
multiple twine lengths to gather sections in to tighten
around bottle’s neck and tie in offset bow.

Add a separate decorative tag or panel
with sentiment
or illustration (not included). Or convert this design
and its
festive contents into the reason that
the “Ten Lords” are “Leaping” as part of
a Twelve Days of Christmas gift series.
Consider assembling the “Tag Leaping
Lord Gift”
(separate design) as coordinated front panel decoration.
Wrap
measures approx. 11” tall with 4.32” diam. base
when assembled and finished.
ASSEMBLY: 1. Identify and cut the shapes:
A main sleeve hull B "seal base and ring
C front panel contrast accent D other panel accents (5)
E base scallop disc F base circle disc (6 for thickness)

on all perforation lines for panel walls, side flange,
top triangle panels; bend forward the narrow curved
bottom tabs.

with center circle hole edges aligned that correspond.
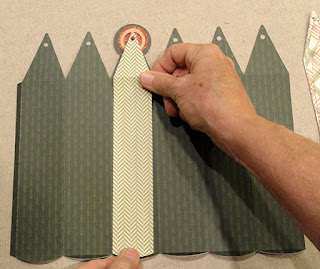
4. Position the seal unit on top of the front panel top panel
with center circles aligned. NOTE that the connector
triangular section should be positioned at bottom,
and should be oriented to be covered when the center
accent panel is positioned and attached over the top of it.

perforation (back) and bottom (forward)
 6. Position and attach the center accent panel
on top of the hull shape, with . . .
. . . upper perforations aligned one on top of
the other and bottom curved tabs bent outward
and perforations aligned.

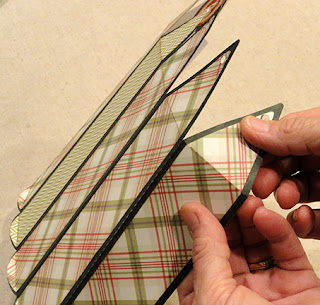
7. Position and attach the other accent panels
in a similar manner, taking care . . .

 . . . top panels with accents can bend together
. . . as bottom tabs are attached that both layers are
bent at perpendicular angle to main wall shape while . . .
inward to eventually follow the bottle's contour
at neck.
 8. Prepare the disc base by layering and attaching
each of the round shapes into a stack (use the center
hole to help center and align the layered shapes).
NOTE that the sample project uses a contrast top
circle with matched core circles.
 Position the scalloped disc on top of disc stack,
with center circles aligned, and glue in place.
 Immediately place the disc stack assembly on a flat
work surface then place a heavy flat object such as
a thick book volume - possibly with something
else heavy on top - on top of the disc stack.
Leave in place to press the stack until the glue is
thoroughly dry. This could require several hours
or overnight.
 9. To reinforce the sleeve cord lacing holes, position
each reinforcement shape on the hull backside
with holes aligned, and glue in place.
 10. Form the sleeve into a tube to align and join
the side seam. Press the sleeve hull flat, if desired,
to allow fingertip pressure to be applied along
the seam to help it adhere and join thoroughly.
Re-form into tube.
 11. Locate the small arch guide cuts near rim
on scallop circle shape which will help position
and align the curve hull bottom tab edge centers.
 Apply glue to backside of hull bottom curve tabs,
them position on top of the disc assembly.
Position each curve tab edge at a guide mark,
adjusting the tube shape to be a symmetrical
hexagon and even all around, then press and attach
securely in place. If helpful, use folio clips to reach
across disc edges to hold each tab in place
while drying.

12. When ready to gift, insert the base of the beverage
bottle into the sleeve, then bend the top triangle panels
inward to match the neck slope angle.
Use decorative twine or cord or ribbon threaded
through the series of holes. One good way
to do this is to begin with the panel to the right
of the contrast "center" panel, threading cord
from backside to front, then repeating for EACH
of the panels, from back to front until all
holes are threaded, then cinch gently and
tie in a knot and bow.
Consider adding the "Lords A Leaping" tag,
with or without the contrast oval behind it
which is included in the tag's file.
(NOTE that the oval as used here has been
reduced to be 4" tall (aspect ratio preserved) or 71%.

No comments:
Post a Comment