
A playful package representing “Nine
(young) Ladies Dancing”
as part of Twelve Days of Christmas gifting.
Short
dimensional twelve-sided box is composed of
base and lid, with top decoration
that presents
a young ballerina from an overhead viewpoint.
Fancy skirt has
icing style decorations (overlay and cutouts).
Arms and torso are built up with
multiple layers
for thickness and sturdiness, then mounted above lid level
on a
short platform.

A pleated rosette/ring can
suggest a fluffy under-skirt.
Alternately, add a “tutu” touch by gathering tulle netting
and attaching at
platform edge under skirt assembly.

Number ‘9’ tag is included to identify the
“Day” gift.
Inside the box, an optional base liner has tabs
to hold a standard
gift card in place.

Box measures approx. 2” tall x 5” diameter “round” top
when
closed. Pairs well with
Tag Dance Shoes separate design.
ASSEMBLY: 1. Identify and cut the shapes:
A lid top layer with platform circle cut out
B platform top disc with wall strip
C lid box top layer
D lid wall strips (2)
E base wall strips (2)
F base interior floor shape G base outer bottom
H skirt build up layers (3-4) plus contrast for cutout
I skirt cut out layer J skirt edge trim
K opt. tutu pleated rosette "ruffle" strips (4)
L opt. base bottom interior layer gift card holder
M girl head/arms base shape (4-5 layers for thickness)
N girl head (3-4 layers for thickness)
O girl head with cut out, eyes, mouth contrast
(NOTE in the final file this shape includes hair)
P girl head/face layer
Q flower for head band (3 petal shapes, center)
R hair base shapes with swirl detail overlays
(includes multiples for stacking for thickness)
S opt. no. 9 tag T opt. netting for tutu

components at the beginning of assembly so that
they will have time to dry completely before being
incorporated in assembly:
A) layer the scalloped skirt disc and glue together,
one layer at a time, matching ALL cut edges as
accurately as possible.
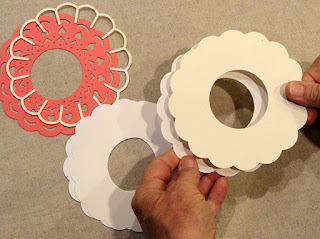 B) add and attach contrast show-thru skirt top layer,
cut outdetails layer, then icing rim on top.

work surface, then placing a heavy flat weight on top
such as this thick book volume. Consider placing something
else heavy on top to help press the shape stack, then
allow the stack to dry completely, for several hours
or overnight. This helps prevent warping or curling as
liquid adhesive dries. Stack, glue and press ALL
multiple shape stacks.
 C) stack and glue together the five different hair shapes;


 D) stack, glue together and press the head/arms
add the various accent swirls to hair component stacks
for top knot, front bangs . . .
. . . then add front bangs stack onto double bangs
stack, along with right swirl overlay . . .
. . . then add bangs double unit and middle swirl
onto assembly . . .
. . . then add top knot on top; press until dry.
and head/hair shapes.


E) Add the head with cut out shape on top of stack,
then fill in with eye contrast at top of cut out, mouth
contrast at bottom; position and attach face layer.
(NOTE that accent coloring should be completed
at face cheek cut lines prior to layering.)
F) layer and glue together the optional no. 9 tag
3. Prepare the base wall shapes by bending back
on all perforations for panels, rim segments, bottom
and side tabs. Bend forward on inner wall segment ends.
However . . .
 . . . DO NOT bend the triangle tabs at the end and
spaced across the rim segments. The wedges may
look like tabs because they contain perforation lines,
but those lines are guide lines to assist in final wall
configuration; bending will make assembly a bit trickier.
 4. Align the two wall lengths so that the end plain
edge of one strip overlaps the tab on the opposite
strip to perforation line, adjust for alignment top
to bottom, then join the seam.
 5. While the wall assembly is in a flat form, bend
the inner wall segments inward to lie behind
main wall segments so that . . .
 . . . the end edge is centered and parallel within
the associated wall segment, with the edge approx.
.125" above the bottom tab fold. The goal with . . .
 . . . connecting the wall wrap-over is to have the RIM
segments perpendicular to the base's vertical walls.
Another way to help check this alignment is to use
a block that has squared walls pushed up against
the rim, then held there until the inner wall tab can
be attached to the main wall backside, as shown.
 NOTE that the end wrap-over segment without
the side seam tab should remain unattached
until the side seam is attached.
 6. Form the wall assembly roughly into a ring and
allow the rim panel short straight edge to remain on top
while the adjacent wedge tab slides underneath. Then . . .
 . . . overlap the end straight wall edge over the opposite
tab, adjust, and join the side seam.
 7. Complete the wrap-over by bending the final
inner wall inward, align, adjust and glue the bottom
edge tab as was done for the previous eleven.
 8. Identify the base's interior floor panel by locating
the two half-circle "bites" on one edge (the outer bottom
is straight on ALL edges), then . . .
 . . . bend the bottom tabs back out of the way to
insert it into the base's interior.
 Re-bend the bottom tabs into place and glue to
the bottom of the base assembly.
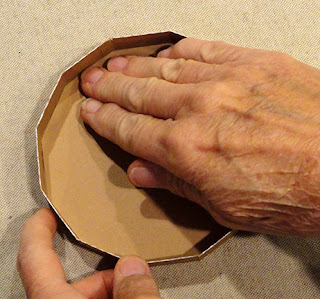
 To assist the bottom tabs to attach in place, invert
the base bottom-down on a flat surface, then apply
finger-tip pressure all around where tabs are
attaching underneath.
 9. Position and attach the outer bottom "floor" panel
on the underside of the base assembly.
(Place small weights inside the base around edges,
if possible, to help press and attach the floor panels.


10. Prepare the lid wall strips by bending back on all
perforation lines for walls, top tabs and bottom tabs, etc.
11. Align and join the first side seam, then . . .

. . . form a ring and complete the second side seam.
12. Bend the rim edge (rounded corner) tabs to
the inside and glue in place all around.

13. Bend top tabs inward and invert lid top down on
work surface. Apply glue to the underside (now the upper
surface) of the tabs, then . . .

. . . insert the interior lid disc inside the lid assembly . . .

. . . and fit into place. Press with fingertips to secure
in place all around. Use weights to hold if desired.
14. Prepare the platform strip by adding medium tight
curl along the whole length. DO NOT bend at the side
seam perforation "guide lines".

15. Form the strip into a ring to overlap straight side edge
over the opposite tab, adjust top to bottom,
and join side seam.

16. Bend the slightly shaped upper tabs inward at
perpendicular angle to wall. Invert the short tube onto . . .

. . . flat work surface, then apply glue to the underside
of the multiple tabs. Then . . .

. . . insert the round "roof" disc into the tube and . . .

. . . fingertip press to secure attachment all around.
Allow to dry thoroughly.

17. Insert the platform top through the circle opening
of the top lid panel and push through fully . . .

. . . and apply glue between platform tabs and disc.
Apply finger tip pressure all around to secure.

OPTIONAL PLEATED ROSETTE "TUTU"
18. Begin to bend the pleats on the first strip at
the tab end - bend at perforation in "valley" fold. Then . . .

. . . continue to bend in alternating "mountain" and
"valley" folds across . . .

. . . the full length of the pleat strip.
Complete the pleating for all four strips.

19. Line up and join the four strips into one length
by overlapping the straight end edge over the adjacent
end tab.

20. Form the strips into a tube to complete the final
side seam.

21. Preview the pleated tutu ring by condensing
the bottom plain edge . . .

. . . into the center.
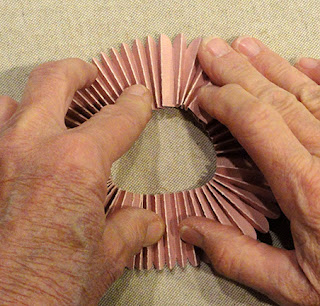
Add pencil ticks around the platform to divide
the circumference into four even lengths.
These divisions on platform disc will align with
the side seams of the pleating length to assist in
distributing the pleating evenly.
Apply quick grab glue such as hot melt glue around
the base of platform, one quarter at a time, then
arrange and push the inward pleat edge in to
attach in place. Repeat for the remaining three quarter
sections, until . . .

. . . the full rosette is in place. Quickly adjust if pleats
are uneven.

OPTIONAL TULLE NETTING TUTU
21. Cut a strip of netting approx. 3.25" wide x 56" long
(full length of yardage), then press in half with matched
long edges. Add gather stitching along the cut edge
approx. .25" in. The fold edge will be the outer ruffle edge.
22. Gather to a length that matches the platform
circumference (approx. 6.375" long). Apply glue to
base of platform, arrange gather ruffle gathered edge
along base, and glue in place. If possible, overlay
ends neatly.

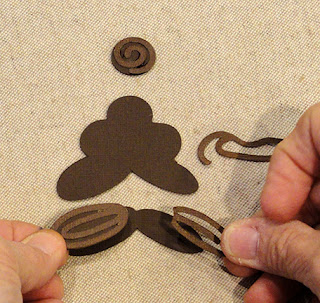
23. Prepare the tiny flower petals by adding some back
and side curl, as much as possible using a narrow
shaft tool such as a stylus tip.
Layer the two-part petal units with petals evenly spaced
around the center (align the center punch), then . . .

. . . layer the single layer on top.


the face/head/hair unit on top of the head/hair
stack (if not already completed), then . . .

. . . stack on and glue to the head/arms stack.
Place the hair band across the hair, then add
the flower on one side of the band.

25. Insert the platform top through the skirt opening,
push down to leave a small margin of platform top
visible at top, and glue in place on top of the netting
or pleated rosette layer.
26. Position and attach the head/arms assembly
onto the top of the platform.

27. Position and attach the ballerina assembly on top
of the lid unit, taking care to center in place with
equal margin all around.

28. Finish the gift box by slipping the optional gift card
panel into the interior bottom of the base, if desired.

Slip the gift card under the pair of tabs to hold.

29. Close the box by placing the lid over the base
and pushing closed.

If desired, attach the no. 9 tag with twine length
wrapped around the platform top between skirt and
arms/head layers.

No comments:
Post a Comment