
Festive
gift box with lots of overlay or cut out details
celebrates the “Eleven
Drummers Drumming” gift of
the Twelve Days of Christmas.
Or perhaps the Little
Drummer Boy or
March of the Tin Soldiers, also Christmas-time
favorites.

Dimensional box is a clamshell format where slightly larger
LID
hinges at bottom center panel to close over BASE,
with tie closure holes at
center top tab.
Includes the numeral 11 tag to help explain
the gift day
number.
Optional gift card tabs liner shapes included.

Box measures approx.
6.25” wide x 6” tall x 1.5” deep
when closed. Consider adding the holly and
cedar sprig
assembly from “Gift Card Envelope Holly Cedar Sprig”
or the “Tag Drummer Drumming” as additional embellishment.
ASSEMBLY: 1. Identify and cut the shapes:
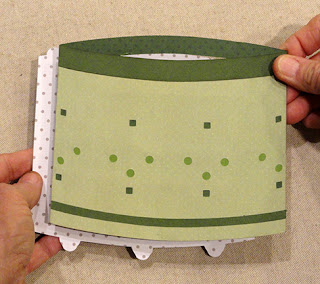
A drum silhouette (shows thru as "skin")
B upper rim C circle punch cutouts underlay
D drum front panel with decoration arches and stars
E drum sticks base with overlay single stick
F optional 11th day tag base and numeral
G drum cords accent with brackets and pin circles
H LID interior "floor" shape to attach to boxing walls
I BASE interior "floor" shape to attach to boxing walls

K LID front inner panel to layer with J
L & M LID boxing strips to join
N tie-closure tab extra layers for strength (2)
O BASE back offset panels (3 for thickness)
P BASE back inner panel to layer with O
Q & R BASE boxing strips to join
S tie-closure tab insert (3 to layer for strength)
T hinge connector strip with accent

 3. Identify the boxing positioning guide marks
2. Layer the LID panels for thickness and glue to join,
taking special care to align all the cut edges
as precisely as possible.
on the inner LID panel, then orient the panel
so they will be best seen (face outward) and . . .
 . . . layer on top of the main panels stack, align
all cut edges and glue together.


Immediately place the glued-up stack under a flat
heavy object such as this thick book (possibly with
something else heavy on top for more weight)
to press the stack flat while the glue dries thoroughly.
This may require several hours or overnight,
to prevent curling or warping of paper when
liquid glue is used for glue-up.
4. Repeat steps 2-3 for the BASE main back panel layers
and for the inner panel with boxing guide marks.
Press and allow to dry.

 6. Position the whole and half stars as shown,
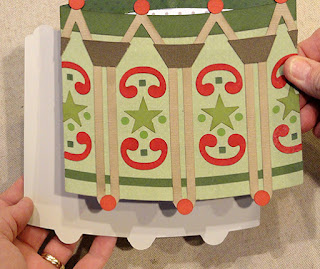
5. Prepare the front drum panel with cutout shapes
by positioning the circles contrast shape behind
the panel and align side edges, then adjust up or
down until only the circle cutouts have the contrast
show thru visible, and glue in place.
with points positioned around the three circles
evenly and consistently, and glue each in place.
 7. Position and attach the accent arcs around the square
cutouts as shown. The whole shapes are NOT interchangeable,
but should be positioned as the original cut file has
them laid out; likewise for the side edges half shapes -
the lower shapes have a more pronounced "bowl" shape.
 8. Position and attach the front rim shape at the top
of the drum front panel with edges aligned.
Also position the bottom accent stripe approx. 1/4"
below the bottom of the lower arcs, and attach.
 9. Assemble the cords accent assembly by
positioning the "brackets" trapezoid and triangle
shapes over corresponding positions on the cord
base, and attaching in place. Also position and
attach the ball finial pins onto the cords base.
 10. Position the drum front assembly (this is shown
without the star and arcs accents in place - but they
should be) over the drum "skin" silhouette, align
edges that correspond, and glue in place.
 11. Position the cords assembly onto the front
of the silhouette/drum panel assembly, matching
the positioning of the finial balls at top and bottom,
and glue in place.
 12. Position and attach the drum front (with all its
accents attached in place) onto the box layered thick
front LID panel, with offset edge margins all around,
and glue in place. Press under heavy flat weight
until all glue-up is completely dried.
 13. If you wish to have the box stand upright for
display, etc., use a straight edge and rotary cutter, etc.
to trim the center bottom finial and panel extension
flat - position straight edge at outer edge of side finials,
then trim away the tiny bit that will make it straight
across, and a flat place for standing.
Repeat for the back thick panel.

use a small paper punch to cut a hole in selected
position - this is where sample project has hole.
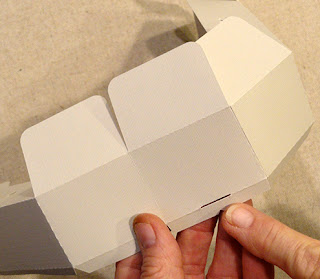
 14. Prepare the BASE boxing strips (identified by
the star cutout - changed to cut outline symbol only)
by bending back on all perforation lines;
bend the cut-in tie-closure tab "forward".

further be identified by the single (LID) or
double "bites" cut from the connecting tab edges.
 15. Position the BASE strips side by side with
the connector tab of one strip (at left) aligned at
the straight edge of second strip, then overlap
straight edge across tab to align at perf line,
and glue seam.


 18. Bend the "inner wall" flanges to backside of strip
16. Layer and glue the BASE's tie-closure tabs
into a stack, with all edges aligned.
17. Locate the BASE tab slot, then . . .
. . . insert the tab stack through so that rounded punch
end is exposed at the face side of boxing, with
edge tab and tab end edges aligned . . .
. . . and glue the tab stack in place to the boxing
edge flange only.
assembly and glue each in place. NOTE it may be
helpful to press these glued-up flanges under weights
while they dry.

then step 18 to bend and glue inner wall flanges,
allowing the cut-in tab to extend up from perforated
rim edge, as shown.

20. Position and attach the two individual LID tab shapes
onto the face side of the flipped-up tab,
as reinforcement.

This image compares the LID strip and tab (top)
with the BASE strip and tab, to help see how they
will relate to each other once the boxing strips
are attached to their respective thickened panels:
the two boxing layers will "nest" so that the tabs
line up and can be tied together as secure closure.

floor panel by identifying the center top panel and flange
(where the tie-closure tab is).
 With flanges bent inward, position boxing edges
along panel, wrapping boxing around . . .
 . . . so that corresponding length boxing panels
match and fit. Once boxing is shaped around panel,
adjust so that panel is "centered" with any excess space
balanced, then . . .
 . . . glue the flanges to backside of floor panel.
Repeat for the second half, if not already positioned
and attached.

22. Repeat the process to position LID panel and
wrap LID boxing, glue in place, etc.
23. Prepare the "hinge" panel by positioning and
attaching the offset accent shape onto the backside
of hinge; also bend the edge tabs back - toward accent.

24. Identify the "bite" cutout that indicates the top
of the hinge, then . . .

. . . position and attach the top tab under the LID
edge at bottom, centering it side-to-side between
the boxing strips open gap.
NOTE that these images show a modified hinge
shape that had side tabs removed; they were
restored in the final cut file design.

25. Repeat step 24 for the bottom of the hinge,
tucking tab under the BASE boxing/floor assembly,
centering side to side, then gluing in place.

26. Prepare to position the LID boxing assembly
onto the back of the LID and drum panel by
applying glue to the underside of the floor assembly,
all around edges, and in center of floor. Then . . .

. . . position onto the inner surface of front built-up panel,
locating the guide marks . . .

. . . then positioning boxing/floor edges at marks,
adjusting, then gluing in place. Apply pressure
all around floor panel to attach securely in place.

27. Repeat the process to apply glue to underside
of BASE, position at BASE thick panel
using guide marks, etc., then glue securely in place.

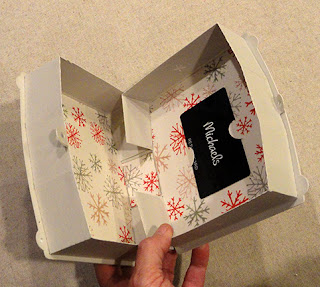
28. Insert a loaded gift card, if desired.
(NOTE that a tabs-free shape is also included in file.)

29. Prepare to close the clamshell box by fitting
the BASE boxing walls inside of the LID boxing . . .

. . . assisting the bottom walls to slide within
LID's walls as shown (NOTE this is a tight fit) . . .
. . . and continuing to close the two, applying
gentle pressure at top corners as necessary
to allow top walls to "nest" properly. Then . . .

. . . press to close completely.

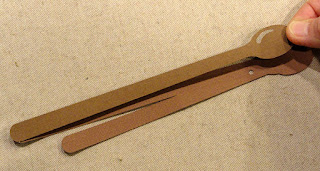
30. Layer and attach the single drum stick onto
the double stick base; press until dry.
31. Finish up the box:
Tie the box closed with narrow ribbon.

Assemble the numeral 11 tag by positioning
number cutout onto tag base and gluing.

Add ribbon "tails" to tag, then tie drum sticks
and tag to the punched LID hole, as desired.
(Or otherwise glue one or both in place to drum front.)

Here is the completed, standing box with
embellishments.

No comments:
Post a Comment