
Gingerbread Boy and Girl, plus Snowman characters
are featured in this trio of dimensional ornaments -
fun projects to hang from pegs or chandelier,
or add several to a Christmas or winter seasonal swag.
Medallion measures approx. 4.625” diam. assembled.
Each begins with a pair of pleated panels join to form
the medallion
base with a pair of holes for twine
or ribbon hanger at top.
Gingerbread Boy or Girl have face area surrounded with
squiggle icing ring, button
smile finials,
dimensional hair bow (girl) or neck bowtie (boy) with cedar and
boxwood sprig as
optional embellishments.
Snowman’s
expression is created with layered button
and “threaded” X stitch eyes, carrot
nose,
three-layered simple top hat with holly accent.
NOTE the rosette assembly steps will be referenced
from a previous tutorial post, then the different designs
will be explained for design differences in assembly,
beginning with Gingerbread Boy, Girl, then Snowman.
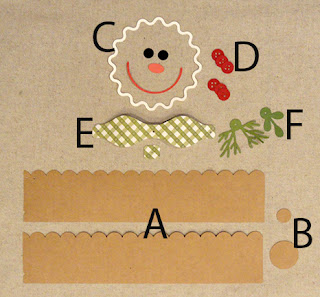
GINGERBREAD BOY ROSETTE ORNAMENT
ASSEMBLY: 1. Identify and cut the shapes:
A rosette pleated left and right strips
B front (small) and back retainer circles
C icing face ring, eyes, nose and smile
D dimensional buttons (2 sets of 3 each)
E dimensional bowtie and front "knot" accent
F optional cedar dbl sprig and laurel sprig
ROSETTE ASSEMBLY (ALL DESIGNS)
2. Follow this LINK to view and follow
the Crow Rosette Ornament design assembly tutorial
Steps 2-9 for the pleating strip folding and
assembly that is basically the same for
all three designs, except . . .

. . . in steps 6 & 7, prepare the pleated ring and
gather from the backside-up position, so that
the larger backside retainer circle is used first on
the rosette BACK, then invert the rosette assembly
so that the very small circle can be carefully positioned
over the center circular tunnel as shown here.

for the hanging ribbon are at the top/north position.
Then position the nose shape to cover the small
retained circle, center, and glue in place.

assembly, thread the length of ribbon through the holes
now, then trim and knot top ends.
 5. Prepare the dimensional buttons by stacking
and gluing three button shapes on top of each other,
aligning ALL of the cut edges as precisely
as possible. Complete 2 buttons.

icing ring centered on rosette, eyes above nose,
smile between nose and icing and centered,
buttons onto ends of smile.

 8. Bend each side inward toward center to align
7. Prepare the dimensional bowtie main shape by
adding some back curl to the center of each "loop"
shape to the side of center, as shown.
(Center does not need curl.)
the punch circles and glue one layer then the other.

9. Position and attach knot shape over front
with punch circles aligned.

10. Assemble the optional sprig embellishment, if desired,
by layering and aligning the punch holes.
11. Position under the bowtie with punch holes aligned,
and glue in place. Insert and attach a mini contrast
brad through the holes as accent.

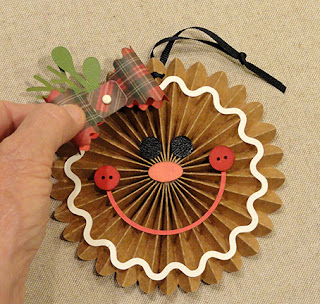
12. Position and attach bowtie under the smile.
It may be helpful to use hot melt glue or equivalent
thick, quick-grab glue to attach.

GINGERBREAD GIRL ROSETTE ORNAMENT
ASSEMBLY: 13. Identify and cut the shapes:
A rosette pleated left and right strips
B front (small) and back retainer circles
D icing face ring, eyes, nose and smile
E dimensional buttons (2 sets of 3 each)
F dimensional hair bow and front "knot" accent
G optional cedar and laurel sprigs

complete the pleating and attach retaining
circles as directed with the exception notes.
15. Prepare the dimensional buttons by stacking

and gluing three button shapes on top of each other,
aligning ALL of the cut edges as precisely
as possible. Complete 2 buttons.
16. Position the remaining face features:
icing ring centered on rosette, eyes above nose,
smile between nose and icing and centered,
buttons onto ends of smile.
17. Prepare the dimensional bowtie main shape by 18. Bend each side inward toward center to align


adding some back curl to the center of each "loop"
shape to the side of center, as shown.
(Center does not need curl.)
the punch circles and glue one layer then the other.
19. Position and attach knot shape over front
with punch circles aligned.
20. Assemble the optional sprig embellishment, if desired,
by layering and aligning the punch holes.
Rotate to arrange the two attractively as desired.
21. Position under the hair bow with punch holes aligned,
and glue in place. Insert and attach a mini contrast
brad through the holes as accent.
22. Position and attach bowtie under the smile.
It may be helpful to use hot melt glue or equivalent
thick, quick-grab glue to attach.
SNOWMAN ROSETTE ORNAMENT
ASSEMBLY: 23. Identify and cut the shapes:
A rosette pleated left and right strips
B front (small) and back retainer circles
D hat crown & base E hat band F hat brim
G holly sprig H berries triple base plus 2 singles
I dimensional buttons bases and ring rims (2 sets of 3 each)
and X threaded faux stitching
J carrot nose

24. Refer to Step 2 above to follow the link and
complete the pleating and attach retaining
circles as directed with the exception notes.
25. Prepare and layer the embellishments:
a) layer and attach the two single berries onto two of
the lobes of the triple berry silhouette;
b) layer and attach the button base and rings separately,
then layer and attach rings onto base, matching
edges as precisely as possible; create 2 buttons.
 Here are the assembled units.
 c) complete the button eyes detail by applying a dab of glue,
centering the X stitch cut out over the center of button,
then tucking the ends down through the holes . . .
 . . . so that the ends poke all the way through.
 26. Prepare the hat shapes for assembling
(NOTE that the top shape shown here was modified
to be a layering "silhouette" - to include the brim -
in the final published version.) Then . . .
 . . . glue the band (centered) onto the silhouette,
followed by the brim shape. Press under flat weight
until liquid glue has thoroughly dried.
26. Add the holly sprig to brim area as desired.
 27. Add the ribbon loop to the ornament top at this point
in assembly (not shown) because punch holes may be
obscured by hat attachment.
28. Position and attach the carrot nose with broad end
(at left here) to cover the smaller front retaining circle.
Determine angle and positioning desired, then attach
the hat.


No comments:
Post a Comment