
Two pleated panels join to
form the medallion base
with a pair of holes for twine or ribbon hanger at top.
Rudi’s expression is created with simple circles
within circles eyes, dimensional
dome nose with overlay hexagon,
double-layer ears and antlers (double for
strength if desired).
Fun project to hang from pegs or chandelier,
or add
several to a holiday swag.
Medallion measures approx. 4.625” diam. assembled.
ASSEMBLY: 1. Identify and cut the shapes:
A rosette pleated strips left and right
B retainer circles small (front) and large
C dimensional nose "box"
D nose box contour top layer and contrast
(NOTE these were modified to be round in final design)
E smile accent F left & right ear shape with reversed backs
G inner ear contrast for left & right
H eye circles and smaller inner circle pupils
I antlers and reverse backside

2. Follow this LINK to view and follow
the Crow Rosette Ornament design assembly tutorial
Steps 2-9 for the pleating strip folding and
assembly that is basically the same for
all three designs, except in steps 6 & 7,
prepare the pleated ring and
gather from the backside-up position, so that
the larger backside retainer circle is used first on
the rosette BACK, then invert the rosette assembly
so that the very small circle can be carefully positioned
over the center circular tunnel.

3. Assemble the features components:
a) layer left and right ears with reversed backside shapes;
b) position and attach contrast inner ear within ear front
shapes, with inward edges aligned, as shown
with ear on left side of this image;
c) layer pupil small circles at lower edge of larger circles
d) position highlight contrast circle behind main red circle.


on all perforation lines for side walls and tabs,
angled upper walls, and lid, as shown.
 5. Bend the upper angled walls inward to overlap
the straight side wall edge across adjacent tab to
perforation line and glue the seam. Complete five
of these seams, then . . .
 . . . form the strip into a ring to complete the final
straight side seam and angled upper seam.
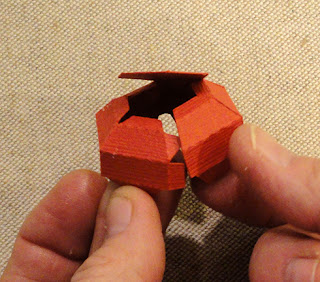 6. Bend the top tabs inward at perpendicular angle,
apply glue to tabs, then bend the "lid" hexagon down
into place, adjust as needed for proper alignment,
then glue in place.
 NOTE that it will be helpful to invert the nose box
top down onto a flat work surface to apply fingertip
pressure from the backside to fully attach tabs.
 7. Position and attach the nose accent assembly,
centered, on the top of the nose box.
 8. Using appropriate thick, quick-grab glue, fold
bottom tabs inward at perpendicular, then apply
glue to outward surface of tabs. Position the nose box
over the front small retainer circle, positioned as low
as possible to still conceal retainer circle, then
center from side to side, and glue in place.
 9. Add the hanging ribbon loop.
Position and attach remaining features, including
eyes, ears balanced and centered as pair . . .
 . . . mouth and antlers.
 Here is the completed Rudolph rosette.

No comments:
Post a Comment